Json Schema with VS Code

JSON was originally introduced as a data format for browser/server communication. It is the most popular format for transferring asynchronous data between browser and server, and for good reason. It is simple, human readable and compact. These attributes have made JSON extremely popular with web developers and has broadened the usage of JSON from just data transfer to various other scenarios. One such use case is configuration files. Many a times these configuration files can be quite complex. In honesty, XML is a perfectly capable and in many cases a better choice for such configurations. However, JSON is gaining popularity in these scenario as well. If you are  tasked with developing a JSON configuration file, you should seriously consider authoring a JSON Schema. It allows you to define you Configurations, have Validations and integrates with various editors to provides intellisense and auto complete. In this post, I walk through the process of creating a JSON schema for a JSON configuration file and integrate it with Visual Studio Code to provide tool tips, Auto complete and Snippets.

Question Bank Example

Lets take a sample json that is used to represent multiple choice questions in a Quiz application.

{
    "Questions_EN" : [
        {
            "question" : "Which is the largest continent in the world!",
            "option_1" : "Asia",
            "option_2" : "Africa",
            "option_3" : "Antartica",
            "option_4" : "Europe",
            "correct_option" : 1,
            "Explaination" : "Asia is X sq meters in area",
            "category" : [
                "GEOGRAPHY"
            ],
            "level" : 3
        },
        {
            "question" : "Who is the person in the picture?",
            "option_1": {
                "image" : "mtx1"
            },
            "option_2": {
                "image" : "mtx2"
            },
            "option_3": {
                "image" : "mtx3"
            },
            "option_4": {
                "image" : "mtx4"
            },
            "correct_option" : 1,
            "multimedia" : [
                {
                    "id" : "mtx1",
                    "type" : "image",
                    "path" : "https://someimageserver.com/image12.png"
                },
                {
                    "id" : "mtx2",
                    "type" : "image",
                    "path" : "https://someimageserver.com/image13.png"
                },
                {
                    "id" : "mtx3",
                    "type" : "image",
                    "path" : "https://someimageserver.com/image14.png"
                },
                {
                    "id" : "mtx4",
                    "type" : "image",
                    "path" : "https://someimageserver.com/image15.png"
                }
            ]
        }
    ]
}

Looking at the above JSON, there are a few things that are evident

  1. You can specify Questions with locale. The key of is of the format Question_<>.
  2. Each question has the following fields. question, option_1, option_2, option_3, option_4, correct_option, explanation, category, level, multimedia

But there are many more conditions that are implemented in the application. For instance

  1. question, 4 options and correct_option are the only fields required.
  2. category is a list of predefined categories [ GEOGRAPHY, HISTORY, MATH, CURRENT_AFFAIRS ]
  3. options can either be text or can be images or audio clips
  4. multimedia types can be images or audio clips
  5. there are other optional attributes for multimedia

Having a Json Schema defined for the file, will not only document these constraints, but also allow us to have validations and intellisense in the code editors.

Here’s how you would define a Schema for the above file.

Writing the Json Schema for Question Bank Example

Having the right tools can make this quite simple. Here’s what I recommend.

  1. A good Editor: VS Code, Sublime etc etc etc. (I will use VS Code)
  2. Json Schema Validator: You can use a simple online Json Schema validator to quickly check if a json is according to your schema. Here’s one I like  http://www.jsonschemavalidator.net

To get started. Lets create a directory and create QuestionBank.json with the contents from the previous section. Create a new file QuestionBank-schema.json in the same directory with the following contents.

{
    "$schema": "http://json-schema.org/draft-04/schema#"
}

Now specify the schema file in your QuestionBank.json

"$schema": "./QuestionBank-schema.json",

Having VS Code in split screen allows you to author your Json Schema and check the json file in tandem. Here’s how your editor should look.

json-schema-1

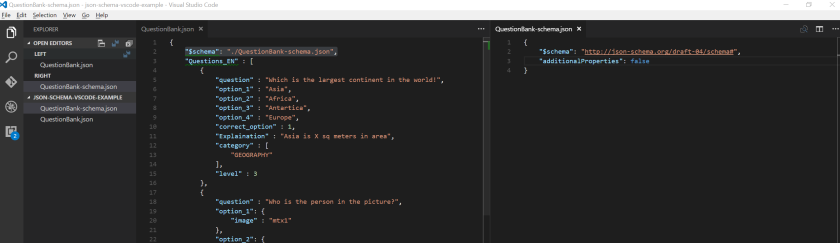
Note that when I added “additionalProperties”: false to the schema file, you see the error in QuestionBank.json. If you hover on the error you can see the error message too.

You can go through the excellent examples at json-schema.org to understand more. For our example, lets add a few things. We want our QuestionBank.json to adher to a schema, so lets add a property called “$schema” in the Schema. Next we use patternProperties to add a format for our Keys. You can use regex to restrict the language code. You can also use $ref to give some structure to your schema. Here’s what the schema looks like now.

{
    "$schema": "http://json-schema.org/draft-04/schema#",
    "properties": {
        "$schema": {
            "type": "string"
        }
    },
    "patternProperties": {
        "Questions_(EN|DE)$": {
            "$ref" : "#/definitions/questions-schema"
        }
    },
    "additionalProperties": false,
    "definitions": {
        "questions-schema": {
            "type":"array",
            "items": {
                "$ref" : "#/definitions/question-schema"
            }
        },
        "question-schema": {

        }
    }
}

Now We can start defining the question-schema. For now, lets assume that options can only be strings. We specify that question, option_1, option_2, option_3, option_4 and correct_option are required fields.
Also, lets create an enum to define allowed Categories.

        "question-schema": {
            "properties": {
                "question" : {
                    "type": "string"
                },
                "option_1": {
                    "type": "string"
                },
                "option_2": {
                    "type": "string"
                },
                "option_3": {
                    "type": "string"
                },
                "option_4": {
                    "type": "string"
                },
                "correct_option": {
                    "type": "integer",
                    "minimum": 1,
                    "maximum": 4
                },
                "moreInfo": {
                    "type": "string"
                },
                "level": {
                    "type": "integer"
                },
                "category": {
                    "$ref": "#/definitions/category-schema"
                }
            },
            "required":[
                "question",
                "option_1",
                "option_2",
                "option_3",
                "option_4",
                "correct_option"
            ],
            "additionalProperties": false
        },
        "category-schema": {
            "enum": [
                "GEOGRAPHY",
                "HISTORY",
                "MATH",
                "CURRENT_AFFAIRS"
            ]
        }
There’s a lot more you can do. For instance you can add MultiMedia options and have the options either be a string or images. The full example can be seen here

Improving the Editing experience with VSCode

Visual Studio Code have extensive support for Json Schema. It uses information from the Json schema to provide tool tips and Auto Complete.

Creating Tool tips

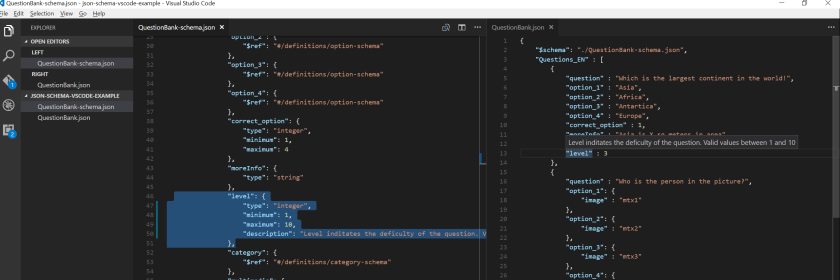
All objects in Json Schema allows you to add a description. This is used by VS Code to show as tool tips.

For example, you can add the following to our example to describe level for a question

                "level": {
                    "type": "integer",
                    "minimum": 1,
                    "maximum": 10,
                    "description": "Level inditates the deficulty of the question. Valid values between 1 and 10"
                },
 Once added you can hover over the text label in QuestionBank.json to see the description.
json-schema-2

Creating Auto Complete Snippets

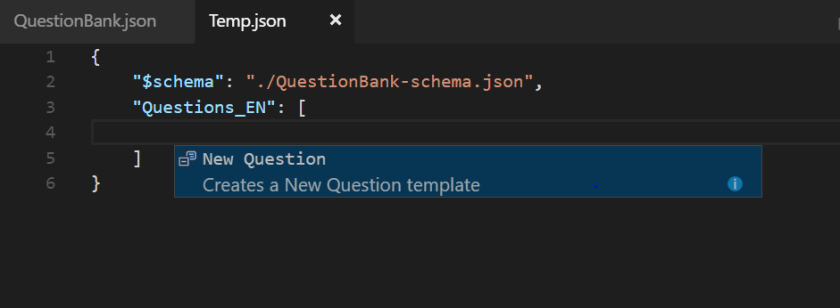
Note that this is specific to VS Code. You can add defaultSnippets to your Json schema which lets you create context specific menus and allows you to create snippets.

Lets say you want to create a create a short cut to create new questions with only required fields. To do this add the following to the questions-schema

            "defaultSnippets": [
                {
                    "label" : "New Question",
                    "description": "Creates a New Question template",
                    "body": {
                        "question": "$1",
                        "option_1": "$2",
                        "option_2": "$3",
                        "option_3": "$4",
                        "option_4": "$5",
                        "correct_option": "^$6"
                    }
                }
            ]

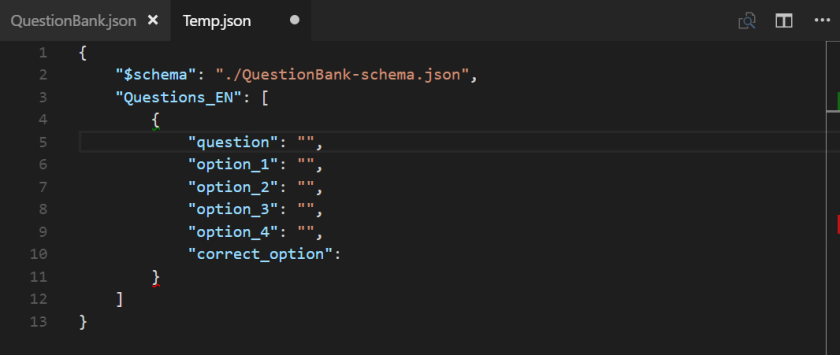
Once added, if you press Ctrl-Space while in “Questions_EN”, you will see a menu showing the option to add a new question.

json-schema-3

Once you click on New Question you will see a snippet added with the required fields.

json-schema-4

For more information on Adding Snippets in VS Code you can see the documentation

You can see the entire examples samples at my GitHub

Getting Client Certificate Authentication working for Azure Web Api

Securing your Web Api using Client Certificates can be quite tricky. In this short blog I present steps to get a sample Web Api running on Azure Web App and enable Client Certificate Authentication.

Getting Started with Azure Web Api is pretty straight forward. You can follow the official documentation on getting started.  For this example I will use the TodoListDataAPI from the getting started tutorial.

Return Client Certificate Information in Response Headers

The first thing I want to do is to ensure that I can test if the client certificate is passed to the Web Api, for doing this I modify the TodoListDataAPI to return certain information of the client certificate, and  return it as headers in the response.

using System;
using System.Collections.Generic;
using System.Collections.Specialized;
using System.Linq;
using System.Web;
using System.Web.Http.Filters;

namespace ToDoListDataAPI.Controllers
{
    public class ClientCertificateHeaderInfoAttribute : ActionFilterAttribute
    {
        public override void OnActionExecuted(HttpActionExecutedContext actionExecutedContext)
        {
            var cert = actionExecutedContext.ActionContext.RequestContext.ClientCertificate;
            actionExecutedContext.Response.Content.Headers.Add("x-ClientCert-Thmubprint", cert != null ? cert.Thumbprint : "Cert is Null");
            actionExecutedContext.Response.Content.Headers.Add("x-ClientCert-FriendlyName", cert != null ? cert.FriendlyName : "Cert is Null");
            actionExecutedContext.Response.Content.Headers.Add("x-ClientCert-Subject", cert != null ? cert.Subject : "Cert is Null");
            actionExecutedContext.Response.Content.Headers.Add("x-ClientCert-ValidFrom", cert != null ? cert.GetEffectiveDateString() : "Cert is Null");
            actionExecutedContext.Response.Content.Headers.Add("x-ClientCert-ValidTo", cert != null ? cert.GetExpirationDateString() : "Cert is Null");

            base.OnActionExecuted(actionExecutedContext);
        }
    }
}

Now you can annotate any method in the Controller to return the client certificate information in the response headers.

 // GET: api/ToDoItemList
 [ClientCertificateHeaderInfo]
 public IEnumerable<ToDoItem> Get(string owner)
 {
     CheckCallerId();
     return mockData.Values.Where(m => m.Owner == owner || owner == "*");
 }

You can use my fork of the Azure Sample that shows the client certificate information passed here.

Getting a Test Client Certificate

There are a variety of ways to procure a Test SSL Certificate. You can use openSSL. The simplest I found was this online tool http://www.cert-depot.com.

Setting up Api App to use Client Certificate

At this stage I assume that you have made the above changes to the TodoListDataAPI and published it to Azure Api App.

The steps in this section are from Azure Documentation. As mentioned in the documentation currently the Azure Portal does not support this, so you would need to use the rest endpoint or ARMClient.

ARMClient PUT subscriptions/{Subscription Id}/resourcegroups/{Resource Group Name}/providers/Microsoft.Web/sites/{Website Name}?api-version=2015-04-01 @enableclientcert.json -verbose

Create a file called enableclientcert.json and have the below contents

{ "location": "My Web App Location",
"properties": {
"clientCertEnabled": true } }


Testing using Fiddler

You can test the site using just your browser, Postman or Fiddler. Below are the steps for Fiddler

To ensure that fiddler picks up the certificate you would need to copy the .cer file at C:\Users\<>\Documents\Fiddler2 and rename it as ClientCertificate.cer

Request

GET https://<<YourSiteName>>.azurewebsites.net/api/ToDoList?owner=* HTTP/1.1
User-Agent: Fiddler
Host: <<YourSiteName>>.azurewebsites.net

Response

HTTP/1.1 200 OK
Cache-Control: no-cache
Pragma: no-cache
Content-Length: 111
Content-Type: application/json; charset=utf-8
Expires: -1
Server: Microsoft-IIS/8.0
x-ClientCert-Thmubprint: <<YourCertThumbprint>>
x-ClientCert-FriendlyName:
x-ClientCert-Subject: E=john.doe@cray.com, OU=Chipset, O=Cray Inc., L=Seattle, S=Washington, C=US, CN=testcert
x-ClientCert-ValidFrom: 12/20/2016 11:17:31 PM
x-ClientCert-ValidTo: 12/20/2017 11:17:31 PM
X-AspNet-Version: 4.0.30319
X-Powered-By: ASP.NET
Set-Cookie: ARRAffinity=a16d4e1921d9f32e6f6ba69a7305a33ebae62e15ce30dddc05dc32f3bb5b0fd6;Path=/;Domain=<<YourSiteName>>.azurewebsites.net
Date: Thu, 22 Dec 2016 08:44:35 GMT

[{"ID":0,"Description":"feed the dog","Owner":"*"},{"ID":1,"Description":"take the dog on a walk","Owner":"*"}]

You can see the certificate information in the Response Headers.

What Next..

If you need to store and access certificates in your Api or Web App in Azure please have a look at this blog.

Do let me know if this was helpful and leave any suggestions/questions in the comments below.